Web Server 7 ECC Performance Notes

As I have mentioned earlier, the upcoming Web Server 7 will include ECC support.

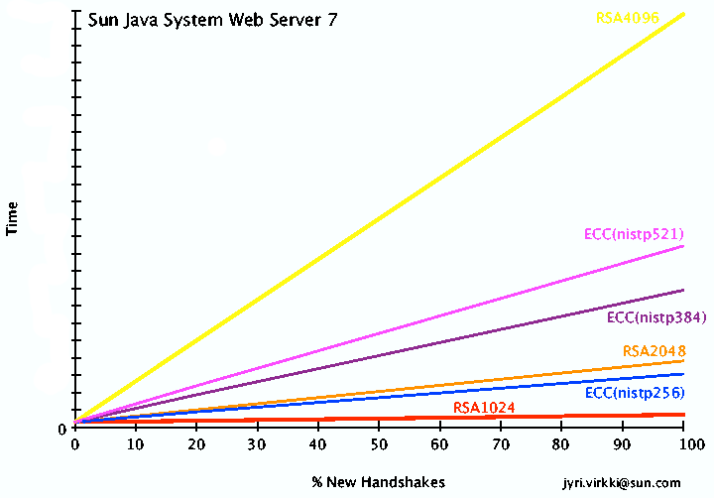
While relative performance predictions comparing RSA and ECC are available in various papers, I was curious to get a glimpse into how it performed in practice in our web server. So, I did a few runs and graphed the results below.

The X axis corresponds to the percentage of new TLS session handshakes during the run (several thousand requests). If a single client were issuing all the requests it would perform one handshake during the initial connection and reuse that TLS session for all remaining requests. As one could expect, in this case there isn’t really any difference between the algorithms and keysizes since no matter how fast or slow the very first connection was, it is a minute portion of the total runtime. At the other extreme is the case of 100% new handshakes – every request comes from a new client and that client doesn’t reuse the session again.

Neither of these extremes is realistic for web server traffic, of course. Normal usage patterns will fall somewhere in between.

The following table shows approximate equivalency in strength between RSA and ECC, to provide some context to the results above:

RSA ECC
1024 160
2048 224
3072 256
7680 384
15360 521

So, we can see that while 1024 bit RSA isn’t too much of a performance burden even if our server experiences lots of new handshakes, things look quite different at 2048 bit RSA. And 4096 bit RSA is nearly off the chart. On the other hand, while ECC with the nistp256 curve is roughly equivalent in strength to 3072 bit RSA, it performed faster than 2048 bit RSA. Not bad.

The higher key length won’t be so interesting for years to come (barring unforeseen advances) but it is interesting to note how the performance compares as keysizes grow. ECC with nistp521 is substantially faster then 4096 bit RSA, even though it is roughly equivalent to 15360 bit RSA in strength!

Note: I ran the web server on a single CPU single core server for these tests. Such machines are hard to come by these days.. so I ran it on a very old box I had sitting around. The absolute numbers aren’t very interesting so I left the Y axis numbering out.

Posted in Sun

Secure Password Storage

If you are using SSL with your Web Server 6.1, your server has one or more private keys. These keys are kept in the NSS database and they are encrypted. In order for the server to read its own keys it will need to decrypt this store, for which it will need the password to the NSS database. When the server is started, if SSL is needed, the server prompts for the password it needs, which is then used to unlock the NSS database.

Often, this is inconvenient. After all, servers need to start unattended. In that case, the only solution is to store the required password somewhere so the server can automatically get it during startup.

This is handled in 6.1 by storing the password in a file called password.conf in the config directory. This file is owned and readable only by the web server process, so it is not possible for other users on the system to get at it.

However, the operating system filesystem permissions are sometimes seen as being too weak. An attacker who manages to crack or bypass the file protections will be able to obtain the cleartext password, which is a problem.

Let’s see how we can improve this situation.

I’ll make a small modification to the start script so it obtains the password by invoking an executable (I’ll call it wsgetpwd) instead of prompting interactively:

99c99,101
<               ./$PRODUCT_BIN -r $SERVER_ROOT -d $INSTANCE_CONFIG_DIR -n $IN
STANCE_NAME $@
---
>               PWD=`wsgetpwd $INSTANCE_CONFIG_DIR`
>               echo $PWD | ./$PRODUCT_BIN -r $SERVER_ROOT -d $INSTANCE_CONFIG_D
IR -n $INSTANCE_NAME $@

Important Note: The content of the start script is not a public interface. This means any changes to it are unsupported and it also means you cannot expect any such changes to continue working after a service pack or version upgrade. You’ve been warned. No production servers were harmed in the writing of this article.

Ok, with this tiny bit of infrastructure in place we can experiment with various implementations of wsgetpwd until we find something superior to keeping the cleartext password in password.conf.

Let’s start simple to see if it works. I create a file called password in the instance config directory to contain the password and implemented wsgetpwd to simply print it out:

% rm -f config/password.conf
% echo password > config/password
% chmod 600 config/password
% cat ../bin/https/bin/wsgetpwd
cat $1/password

Starting the server shows that it works fine. So far so good. We haven’t accomplished much yet though – if our attacker can bypass the filesystem permissions on password.conf, they might also bypass the permissions on the new password file.

So, let’s improve wsgetpwd. This time I’ll obfuscate the password using base64 (btoa/atob are small utils from NSS which do this encoding) so it is no longer human-readable.

% echo password | btoa > config/password
% cat config/password
cGFzc3dvcmQK
% cat ../bin/https/bin/wsgetpwd
cat $1/password | atob

Now, even if an attacker manages to read the password file, they’ll only get “cGFzc3dvcmQK” which doesn’t really do them much good (unless they know about atob or base64, but how likely is that?)

Nonetheless, it’s been suggested that the password will be safer if it is encrypted with a proper encryption algorithm. Encryption is really hard to break, so that will certainly improve the security even further. I’ll use encrypt(1).

Some prep work is needed first. I’ll use AES encryption and I’ll use /dev/random to obtain bits for the key and then I’ll encrypt the password with that key into the password file. Finally, I reimplement wsgetpwd to decrypt the password at runtime.

% dd if=/dev/random of=config/encrypt.key bs=1 count=16
% chmod 600 config/encrypt.key
% echo password | encrypt -a aes -k config/encrypt.key > config/password
% cat config/password | od -x
0000000 0000 0100 0000 e803 058c 6f08 5b48 c607
0000020 3517 7fc5 65ce c64e 95ff 576d ee95 4cb4
0000040 e990 5834 df32 9042 df90 9937 47f4 a464
0000060 2720 f8db ad0a d089
0000070
% cat ../bin/https/bin/wsgetpwd
decrypt -a aes -k $1/encrypt.key -i $1/password.aes

Start the server and.. it works! The password is now encrypted with AES on disk and the server is still able to start automatically. When our attackers crack the filesystem permissions on the password file all they will get is the encrypted bits (shown by the od -x output above) – the cleartext password remains secure.

If you’ve read this far, one final thought: Should I file this article under “Web Server Security” or under “Light Comedy”?

Posted in Sun

Self-signed SSL Certificates in Web Server 6.1

When working with SSL-enabled web servers it is often useful to create self-signed certificates for testing and development. This is much quicker and more convenient than going through an external CA when all you need to do is run some tests on your development machine. Unfortunately Web Server 6.1 (formally, Sun Java System Web Server 6.1 (which you may also have met under the SunONE or the older iPlanet brand names)) does not support creating self-signed certificates through the admin UI. On the bright side, it is actually quite easy to create these certificates using the NSS tool certutil.

First: Create the NSS databases

You can do this through certutil, but let’s do it through the supported admin UI interface. “Servers” -> “Manage Servers” -> select server, click ‘Manage’. Then click “Security” tab. Enter password twice into the fields and submit. Popup says “Success”! -> Click OK.

Second: Create a local CA

Despite the title of this entry, instead of directly creating a self-signed cert, I’ll first create a local CA for myself and then use it to sign the server cert, so I can demonstrate both possibilities. If you prefer, skip the hierarchy and generate a self-signed server cert directly.

Go to the alias directory under the install root. That is where the NSS database files live in 6.1. At this point you should have at least the files shown below in the alias directory.

Note that boqueron.virkki.com here is the host and domain name, your files will have names corresponding to your installation. For all subsequent commands in this example, substitute the corresponding names for your instance in place of these.

$BASE/alias% ls -1
https-boqueron.virkki.com-boqueron-cert8.db
https-boqueron.virkki.com-boqueron-key3.db
secmod.db

You can use certutil -L to list all the certs in the database. If you just created the database through the UI like I did, it’ll be empty:

$BASE/alias% certutil -L -d . -P "https-boqueron.virkki.com-boqueron-"
certutil -L -d . -P "https-boqueron.virkki.com-boqueron-"

Now, I will create a sample CA with certutil (note this is a single command line, which I’ve split here only for readability). I have ommitted some of the output for brevity:

$BASE/alias% certutil -S  -P "https-boqueron.virkki.com-boqueron-"
   -d . -n SelfCA -s "CN=Self CA,OU=virkki.com,C=US" -x -t "CT,CT,CT"
   -m 101 -v 99 -5

Generating key.  This may take a few moments...

                          0 - SSL Client
                          1 - SSL Server
                          2 - S/MIME
                          3 - Object Signing
                          4 - Reserved for futuer use
                          5 - SSL CA
                          6 - S/MIME CA
                          7 - Object Signing CA
                          Other to finish

Enter 5 since we want a CA.

                          0 - SSL Client
                          1 - SSL Server
                          2 - S/MIME
                          3 - Object Signing
                          4 - Reserved for futuer use
                          5 - SSL CA
                          6 - S/MIME CA
                          7 - Object Signing CA
                          Other to finish

Enter 9 to end.

Is this a critical extension [y/n]?

Enter y.

Third: Use this local CA to sign your server cert

$BASE/alias% certutil -S  -P "https-boqueron.virkki.com-boqueron-"
   -d . -n MyServerCert -s "CN=boqueron.virkki.com,C=US" -c SelfCA -t "u,u,u"
   -m 102 -v 99 -5

Generating key.  This may take a few moments...

                          0 - SSL Client
                          1 - SSL Server
                          2 - S/MIME
                          3 - Object Signing
                          4 - Reserved for futuer use
                          5 - SSL CA
                          6 - S/MIME CA
                          7 - Object Signing CA
                          Other to finish

Enter 1

                          0 - SSL Client
                          1 - SSL Server
                          2 - S/MIME
                          3 - Object Signing
                          4 - Reserved for futuer use
                          5 - SSL CA
                          6 - S/MIME CA
                          7 - Object Signing CA
                          Other to finish

Enter 9 to end.

Is this a critical extension [y/n]?

Enter y.

Try certutil -L again, this time you’ll see both your CA and your server cert:

$BASE/alias% certutil -L -d . -P "https-boqueron.virkki.com-boqueron-"
certutil -L -d . -P "https-boqueron.virkki.com-boqueron-"
MyServerCert                                                 u,u,u
SelfCA                                                       CTu,Cu,Cu

Also try looking at them from the admin UI. Under “Security” ->”Manage Certificates”, you will see these newly created certificates listed.

That’s it! You can now assign the MyServerCert to any of your SSL-enabled listeners.

For example, if you want to change one of your non-SSL listeners to enable SSL and use the new certificate, you can follow this sequence in the admin UI: “Preferences” -> “Edit Listen Socket” -> click on an ls ID to edit. Then check the security box and click OK. Once again, “Edit Listen Socket” -> click on the same ls. This time you see SSL options, change any if desired and then click OK. Finally Apply to apply the changes.

I used quite a few options to certutil which I didn’t describe in any detail to keep this brief. Run certutil -H to read the description of every option I used (and the ones I didn’t) so you can tailor the options to your needs.

Posted in Sun