Below is a list of measurements and other information I have been
gathering while I experiment with the Ground Control coilover kit in
an attempt to find the perfect setup.
NOTE: Bumpstop information page is now separate from this Ground Control info page.
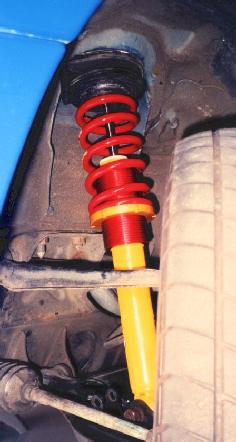
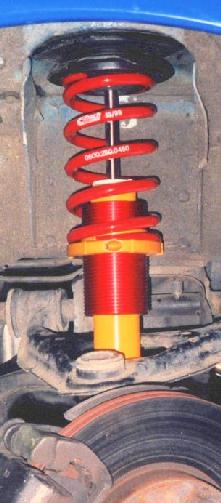
Ground Control coilovers with Koni springs, lowest of the three grooves on the Konis. '93 Miata.
Springs: Eibach: 450lb/in 6" Front ; 275lb/in 7" Rear, as recommended by Ground Control (about 8/5 or see conversions).
Sway bars: Front: measured 22.25mm (probably sold as a 7/8"). Rear: measured 15.9mm (probably sold as a 5/8").
Front bump stop had 1 rubber "donut" on it, rear one had none (all cut off, only the "cone" remaining). (More on bumpstops later)
Note: All measurements are from fender lip to the hub center (center of wheel). All numbers in inches.
Most ride height measurement are quoted as the distance from fender to wheel center, so keep the above in mind while reading the tables below, and adjust accordingly if comparing to numbers from other sources. I prefer to measure to the top of the center hole because it is more consistent.
Lowest possible
===============
Wh      height          travel
------------------------------
LF      11.0625         < 1
RF      10.9375         < 1
RR      11.125          ~ 1
LR      11.0625         ~ 1


Highest possible
================
Wh      height          travel
------------------------------
LF      14.375          ~2.15
RF      14.25           ~2.15
RR      13.5            ~2
LR      13.5            ~2
"Highest" is a bit relative. This was measured with the springs touching the top of their base, but only hand tight. The "travel" column is approximately how much shock travel is available at the given ride height.
GOAL: Raise ride height to stock specification to maximize suspension travel, and measure how much travel is used up during track event. With this information, it should be possible to lower the car by this amount, to achieve the lowest height that does not bottom out.
Shock travel was measured by tying a tie wrap to each shock tube to serve as a record of the highest point of travel reached by the shock body.
Settings: Goal is approximately 13"F/13.5"R which is basically the factory ride height, within the shop manual variance of front to rear.
Wh      height          NL-S    NL-A     L-S    L-A
-----------------------------------------------------
LF      13.06           6       3.75    4.19    1.75
RF      13.06           6       3.63    4.25    1.75
LR      13.5            6.75    4.13    4.75    2.06
RR      13.5            6.75    4.19    4.69    2.13
NL-S : Spring length, No Load on suspension (free hanging, w/tire)
NL-A : Available suspension travel (top of shock to bump stop), No Load on suspension (free hanging, w/tire)
L-S : Spring length, as above, but with full static load on suspension.
L-A : Available travel, as above, but with full static load on suspension.
RESULTS: After a track session (Thunderhill), unused travel was ZERO on each shock. All the travel was used up, and the tie wraps were slammed into the bump stops.
Based on the above experience, I wanted to know how much shock travel was actually being used by various levels of driving. Since the shocks bottomed out at the track, I had no info whether they were bottoming out only at the extremes of cornering or while driving around the pits.
Settings: As described above, no changes.
RUN 0: Before starting; static travel as in previous table.

Travel Remaining:       LF= 1.75                RF= 1.75
                        LR= 2.0625              RR= 2.125

RUN 1: Soft loop around neighborhood streets, no more than 25mph, a few
stop signs, all curves were right handers.

Travel Remaining:       LF= 0.5                 RF= 0.875
                        LR= 1.375               RR= 1.625

RUN 2: Local road, constant 40mph, a few sweeping turns, two
slightly tigher, normal driving, strictly non-enthusiast level.

Travel Remaining:       LF= 0.3125              RF= 0.5
                        LR= 0.9375              RR= 1.125

RUN 3: Local road to highway, off & back on, exit. Four off-ramps in total,
all right handers, taken at a slightly enthusiastic level (small chirp
or two from street tires).

Travel Remaining:       LF= zero                RF= 0.5
                        LR= 0.5                 RR= 1.0
From the above, it appears that 450F/275R is adequate for normal street driving, it is just at the track that it bottoms out all the time.
After the above tests, I replaced the old cut bumpstops with new 94+ style stops all around. See my bumpstop info page for more details about this. I left the ride height at the previous level (stock height essentially).
Wh      height
--------------
LF      13
RF      13
LR      13.5
RR      13.5
After these changes I'm very happy with the current setup. The car is nicely balanced and the sudden bump in the stiffness curve is completely gone. The car inspires a lot of confidence now, allowing me to push the limits at the track far higher than before. It is also comfortable enough to be a daily driver for my ~30 mile commute. I plan on changing nothing else, it is now perfect.